- Forum
- My Mountain Town: What's New
- My Mountain Town: FAQ Forum
- All About Our Community Calendar & How To Add An Event
All About Our Community Calendar & How To Add An Event
- MyMountainTown
-
 Topic Author
- Mountain Champion
-

Less
More
08 Dec 2014 22:34 - 27 May 2021 22:20 #1
by MyMountainTown
One of the best features of My Mountain Town is our
Community Calendar!
Our advertising businesses and all local nonprofits can share what they have going on for the community, and community members find out what's happening when and where so they don't miss out! There are several awesome features to our calendar, the first of which is that it is categorized and you can choose what you are most interested in finding!
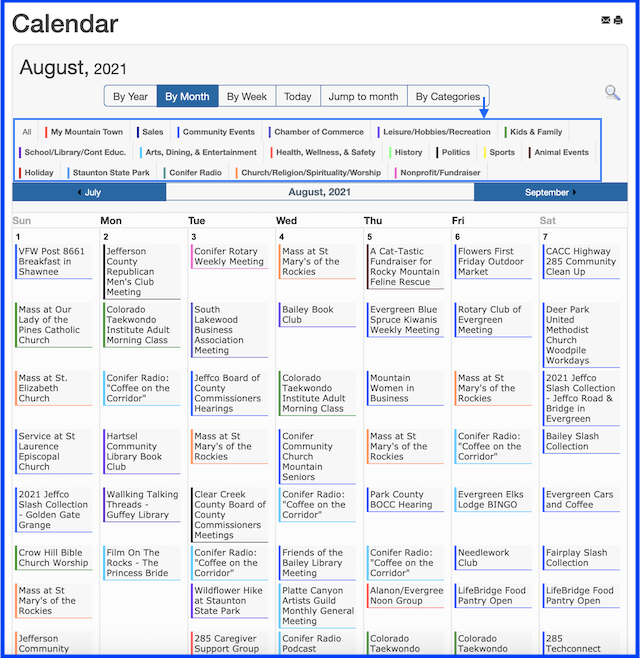
All of the categories are listed at the top of the calendar. Clicking on one of the categories will show only the events that have been uploaded for that category. The default view is ALL Categories in a month view. You can click the month before or after to change months displayed.
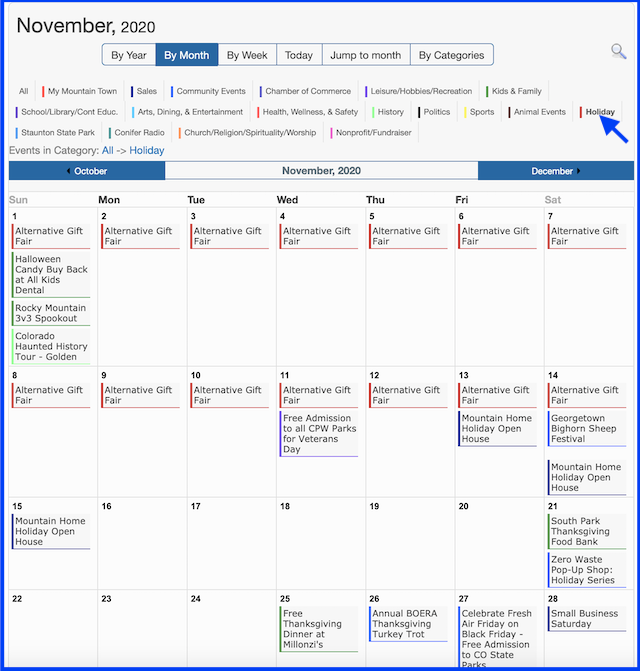
For example, here's what's listed in our Holiday Category with the month view:
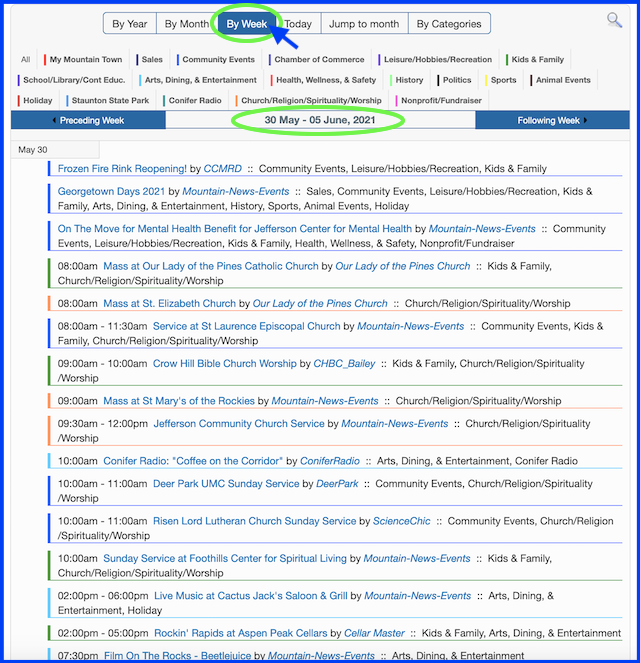
If you wish to break it down into a smaller time segment, click the 'By Week' or 'Today' link at the top to see a list view:
You can also search the calendar by keywords to find upcoming (or past) events.
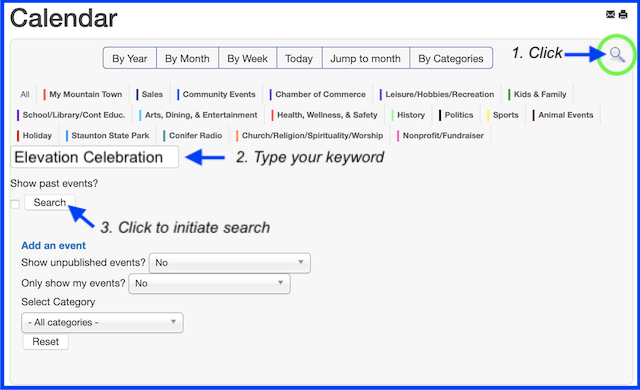
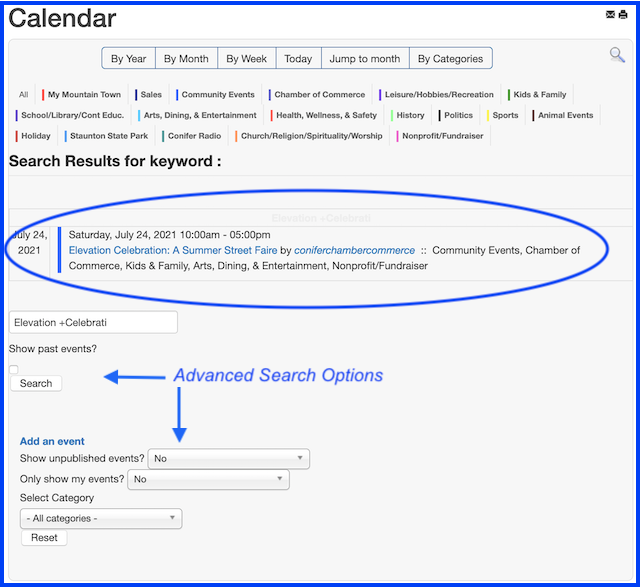
If your search doesn't come back with a result, you can click 'Add Event' to upload an event that is missing. Or, you can try changing the parameters of your search by including events that may have already been submitted but not approved yet, only your events or all events, and by specific category or the whole calendar.
Next up: how to add an event to the calendar!
All of the categories are listed at the top of the calendar. Clicking on one of the categories will show only the events that have been uploaded for that category. The default view is ALL Categories in a month view. You can click the month before or after to change months displayed.
For example, here's what's listed in our Holiday Category with the month view:
If you wish to break it down into a smaller time segment, click the 'By Week' or 'Today' link at the top to see a list view:
You can also search the calendar by keywords to find upcoming (or past) events.
If your search doesn't come back with a result, you can click 'Add Event' to upload an event that is missing. Or, you can try changing the parameters of your search by including events that may have already been submitted but not approved yet, only your events or all events, and by specific category or the whole calendar.
Next up: how to add an event to the calendar!
Last edit: 27 May 2021 22:20 by MyMountainTown. Reason: Updated screenshots to reflect current Calendar view
Please Log in or Create an account to join the conversation.
- MyMountainTown
-
Topic Author
- Mountain Champion
-
26 Dec 2014 22:42 - 28 May 2021 01:16 #2
by MyMountainTown
Replied by MyMountainTown on topic All About Our Community Calendar & How To Add An Event
How To Add an Event to the Community Calendar
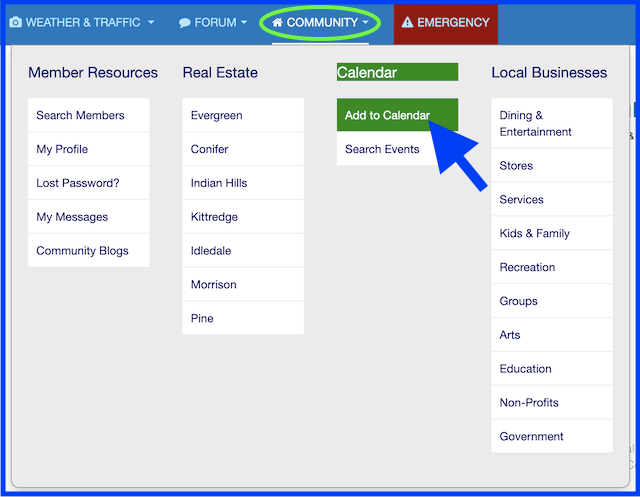
1. Hover on the 'Community' Site Menu option to open the drop-down menu, then scroll down to select 'Add to Calendar'.
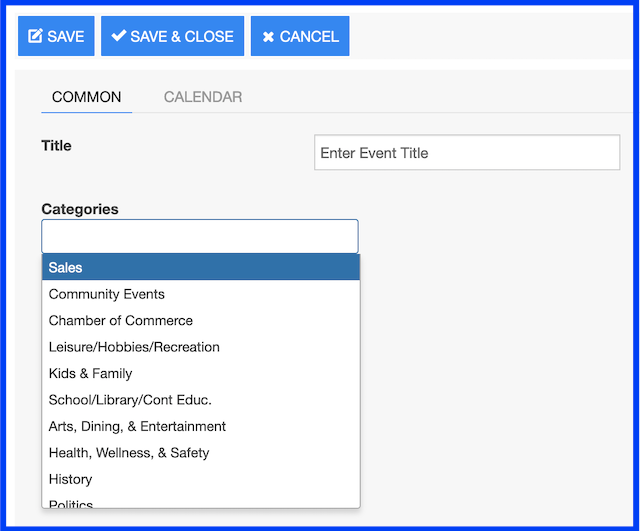
2. This opens up the Common Page of the Calendar Submission Form. You'll see only the field for the event title at first. Once you enter the title, the Calendar Categories box will open and you can click in the box to open the drop-down menu option and choose which category/categories fit your event type.

Categories: this is important because this feature allows people to search for types of events they are most interested in on our Calendar, such as Sales, Kids & Family, Sports, History, Holiday, Politics, etc. You may select more than one category, but please limit it to applicable categories (for example, a yoga class that's for adults only would go under Healthy & Wellness, and not Family); we reserve the right to add or remove categories chosen. If there is a category that you would like added that we don't have, please ask!
Our Diamond Level advertisers get their very own category (such as Conifer Radio); if this is a feature that would greatly benefit your business because you hold many events, we would love to share more details with you - email This email address is being protected from spambots. You need JavaScript enabled to view it..
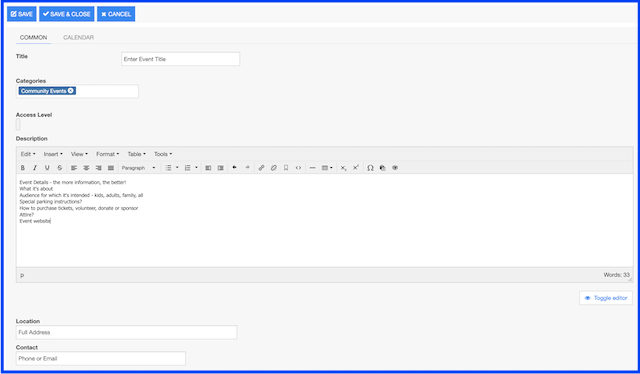
3. Enter the event details in the dialog box. Feel free to use the WYSIWYG Editor buttons to change font sizes, colors, justification of text, etc. The more text the better, as search engines will index it for keywords for searches. Explain what your event is about, who it benefits, how and where to attend, intended audience (kids, adults, families), special attire (costumes, formal, etc) requested, parking instructions, or any other pertinent details. Include a link to the event page on your website, or a link for where people can purchase tickets - make it easy for everyone to attend!
Lastly, enter the full address of the location where the event will take place and contact information for people to obtain more details or purchase tickets.
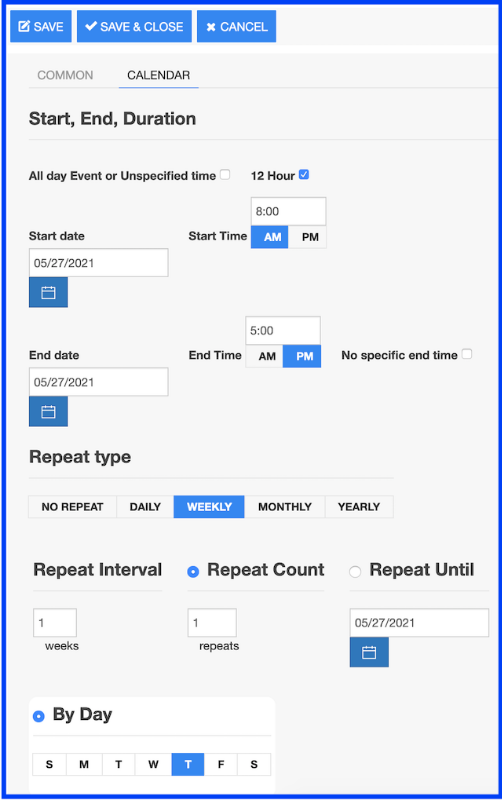
4. Once the Common Page is complete, click the Calendar button near the top to get to the Calendar Page so you can set the correct date for your event (default is the day you enter the event):

The first option to click is 'All day Event or Unspecified time'. By default it is unchecked. If you have defined start and/or end times for your event leave it blank.
Next are the Start and End Dates. They default to the day you submit the event so if you forget to go to this page, your event will post the day you upload it to the calendar and then may get missed by an admin for approval. To change the date, click on the calendar icon next to the date listed, then click on the date, or switch to the future month on which your event occurs by clicking on the right-facing arrow next to the name of the month to move forward through the calendar. The End Date will change to the same date as the start date; if you want a different date, just repeat that step. DON'T FORGET to switch the a.m. to p.m. and vice versa! What is highlighted in blue is what is selected as your option. If there is no specific end time to your event, then click the box to the right of the end date time.
Repeat Type: is your event a daily, weekly, monthly, or yearly occurrence? Our calendar can save you time loading repeat events with this handy feature! It's a little tricky though, so if you need any assistance walking you through getting the hang of it, please give us a call or shoot us an email with your questions! 720-608-0285 or This email address is being protected from spambots. You need JavaScript enabled to view it.
Daily: Is your event happening every day without skipping days? Then leave the default interval to 1. If it is every other day, set it to 2, and so on. Now, you can choose either 'Repeat Count' OR 'Repeat Until'. The 'Repeat Count' option is selected by default with the dot in the circle; just enter the total number of days on which your event occurs (including the date you've set above as your initial event or it will upload one date shy onto the Calendar). If you choose 'Repeat Until', then click on the circle to choose that option and simply enter the final date your event occurs on by clicking on the Calendar icon to the right and selecting the month and day.
Weekly: If your event occurs every week, even if on multiple days of each week, choose this option. Same as with the Daily option, the default on interval is 1 and you can change it to 2 if it is every other week. If it's a different interval than that, then the Monthly option, discussed next, might be easier.
Again, you can choose either how many Repeat Counts or Repeat Until Date.
The new option that pops up when selecting Weekly is the 'By Day' menu bar at the bottom. Click on which day(s) your event occurs - if it is highlighted in blue, then that is the day it will show on the calendar. If it's a Monday, Wednesday, Friday class for example, then click off S, T, T, and S.
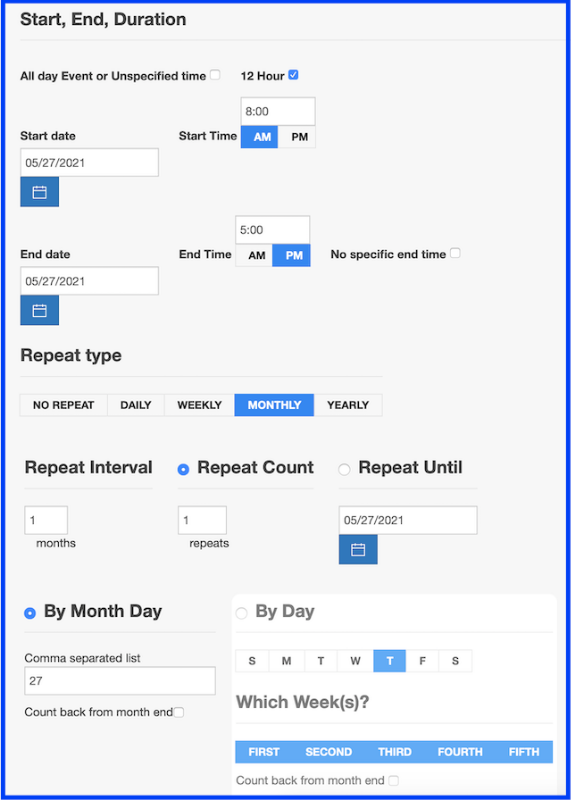
Monthly: if you have an event that occurs every month, whether always on the 4th, every 2nd Tuesday, or the last Friday of every month, then this is the option to choose. Once you click on 'Monthly', several new options appear. The first is 'By Month Day' and this is a good option if it's not a regular weekly occurrence over the month. In that box, you can enter the exact dates on which your event occurs.
The second is 'By Day'. If your event occurs on the same week/day, then you can choose which day(s) to have it displayed on the Calendar. Note that every day is highlighted in blue by default - this means every day is selected as an active day to display your event! Click each box to un-select the days on which it does NOT occur. Choose the 'Count back from month end' if it's one that changes based on the last week of the month, for example (e.g. your group only meets on the 5th Sunday, if there happens to be one that month, or always on the last Friday of the month, no matter if it's week 4 or week 5). In the example below, the event occurs every month on the 2nd and 4th Fridays.
Yearly: good for annual events that always happen on the same date every year. Unfortunately, the software doesn't give the monthly options, such as 2nd Saturday of July, so it's a very limited option available to us. Future updates may change this, but for now, your best bet is probably to manually update your events each year.
5. When the form is completely filled out, and you can toggle between the Common Page and the Calendar Page as often as you like while filling it out, please be sure to hit the 'Save and Close' link at the top otherwise it will not be saved. Once your event is submitted, it will be sent to the admins for approval.

All nonprofit members are automatically granted Gold Level status - you may submit up to 2 events per month. Any business wishing to upload events, or nonprofits wishing to enter more than 2 events per month, please contact us for details on how to proceed! Events that are free and open to the community or holiday events may be added anytime.
Members: you are welcome to add your garage/yard sales, any event that you know of happening in the community that we're missing, church events, etc. Please enter as much information as you can, and we'll contact the organization for more details as needed. If you have any questions, or need some help, please don't hesitate to reach out - we're here for you and happy to help!
1. Hover on the 'Community' Site Menu option to open the drop-down menu, then scroll down to select 'Add to Calendar'.
2. This opens up the Common Page of the Calendar Submission Form. You'll see only the field for the event title at first. Once you enter the title, the Calendar Categories box will open and you can click in the box to open the drop-down menu option and choose which category/categories fit your event type.
Categories: this is important because this feature allows people to search for types of events they are most interested in on our Calendar, such as Sales, Kids & Family, Sports, History, Holiday, Politics, etc. You may select more than one category, but please limit it to applicable categories (for example, a yoga class that's for adults only would go under Healthy & Wellness, and not Family); we reserve the right to add or remove categories chosen. If there is a category that you would like added that we don't have, please ask!
Our Diamond Level advertisers get their very own category (such as Conifer Radio); if this is a feature that would greatly benefit your business because you hold many events, we would love to share more details with you - email This email address is being protected from spambots. You need JavaScript enabled to view it..
3. Enter the event details in the dialog box. Feel free to use the WYSIWYG Editor buttons to change font sizes, colors, justification of text, etc. The more text the better, as search engines will index it for keywords for searches. Explain what your event is about, who it benefits, how and where to attend, intended audience (kids, adults, families), special attire (costumes, formal, etc) requested, parking instructions, or any other pertinent details. Include a link to the event page on your website, or a link for where people can purchase tickets - make it easy for everyone to attend!
Lastly, enter the full address of the location where the event will take place and contact information for people to obtain more details or purchase tickets.
4. Once the Common Page is complete, click the Calendar button near the top to get to the Calendar Page so you can set the correct date for your event (default is the day you enter the event):
The first option to click is 'All day Event or Unspecified time'. By default it is unchecked. If you have defined start and/or end times for your event leave it blank.
Next are the Start and End Dates. They default to the day you submit the event so if you forget to go to this page, your event will post the day you upload it to the calendar and then may get missed by an admin for approval. To change the date, click on the calendar icon next to the date listed, then click on the date, or switch to the future month on which your event occurs by clicking on the right-facing arrow next to the name of the month to move forward through the calendar. The End Date will change to the same date as the start date; if you want a different date, just repeat that step. DON'T FORGET to switch the a.m. to p.m. and vice versa! What is highlighted in blue is what is selected as your option. If there is no specific end time to your event, then click the box to the right of the end date time.
Repeat Type: is your event a daily, weekly, monthly, or yearly occurrence? Our calendar can save you time loading repeat events with this handy feature! It's a little tricky though, so if you need any assistance walking you through getting the hang of it, please give us a call or shoot us an email with your questions! 720-608-0285 or This email address is being protected from spambots. You need JavaScript enabled to view it.
Daily: Is your event happening every day without skipping days? Then leave the default interval to 1. If it is every other day, set it to 2, and so on. Now, you can choose either 'Repeat Count' OR 'Repeat Until'. The 'Repeat Count' option is selected by default with the dot in the circle; just enter the total number of days on which your event occurs (including the date you've set above as your initial event or it will upload one date shy onto the Calendar). If you choose 'Repeat Until', then click on the circle to choose that option and simply enter the final date your event occurs on by clicking on the Calendar icon to the right and selecting the month and day.
Weekly: If your event occurs every week, even if on multiple days of each week, choose this option. Same as with the Daily option, the default on interval is 1 and you can change it to 2 if it is every other week. If it's a different interval than that, then the Monthly option, discussed next, might be easier.
Again, you can choose either how many Repeat Counts or Repeat Until Date.
The new option that pops up when selecting Weekly is the 'By Day' menu bar at the bottom. Click on which day(s) your event occurs - if it is highlighted in blue, then that is the day it will show on the calendar. If it's a Monday, Wednesday, Friday class for example, then click off S, T, T, and S.
Monthly: if you have an event that occurs every month, whether always on the 4th, every 2nd Tuesday, or the last Friday of every month, then this is the option to choose. Once you click on 'Monthly', several new options appear. The first is 'By Month Day' and this is a good option if it's not a regular weekly occurrence over the month. In that box, you can enter the exact dates on which your event occurs.
The second is 'By Day'. If your event occurs on the same week/day, then you can choose which day(s) to have it displayed on the Calendar. Note that every day is highlighted in blue by default - this means every day is selected as an active day to display your event! Click each box to un-select the days on which it does NOT occur. Choose the 'Count back from month end' if it's one that changes based on the last week of the month, for example (e.g. your group only meets on the 5th Sunday, if there happens to be one that month, or always on the last Friday of the month, no matter if it's week 4 or week 5). In the example below, the event occurs every month on the 2nd and 4th Fridays.
Yearly: good for annual events that always happen on the same date every year. Unfortunately, the software doesn't give the monthly options, such as 2nd Saturday of July, so it's a very limited option available to us. Future updates may change this, but for now, your best bet is probably to manually update your events each year.
5. When the form is completely filled out, and you can toggle between the Common Page and the Calendar Page as often as you like while filling it out, please be sure to hit the 'Save and Close' link at the top otherwise it will not be saved. Once your event is submitted, it will be sent to the admins for approval.
All nonprofit members are automatically granted Gold Level status - you may submit up to 2 events per month. Any business wishing to upload events, or nonprofits wishing to enter more than 2 events per month, please contact us for details on how to proceed! Events that are free and open to the community or holiday events may be added anytime.
Members: you are welcome to add your garage/yard sales, any event that you know of happening in the community that we're missing, church events, etc. Please enter as much information as you can, and we'll contact the organization for more details as needed. If you have any questions, or need some help, please don't hesitate to reach out - we're here for you and happy to help!
Last edit: 28 May 2021 01:16 by MyMountainTown. Reason: updated to reflect current calendar view following software updates
Please Log in or Create an account to join the conversation.
- Forum
- My Mountain Town: What's New
- My Mountain Town: FAQ Forum
- All About Our Community Calendar & How To Add An Event
Time to create page: 0.325 seconds
sponsors