How to Upload and Post a Picture
- MyMountainTown
-
 Topic Author
- Mountain Champion
-

Less
More
28 Jul 2014 20:19 - 06 Jan 2017 11:46 #1
by MyMountainTown
How to Upload and Post a Picture was created by MyMountainTown
We are very excited to be the first community forum in our area offering direct uploading of photos, making it easier for you to share yours here! Something brand new we are extremely happy to offer is that you can easily "drag & drop" your photos right into your post! No more cumbersome uploading off-site and copying confusing urls to display your beautiful images.
We love seeing the local wildlife, amazing landscape scenery, flowers, trails, weather, breaking events such as fires, vacations to exotic places, things you have to sell, and more! Thank you for sharing your images with our members and guests!
To upload a photo,
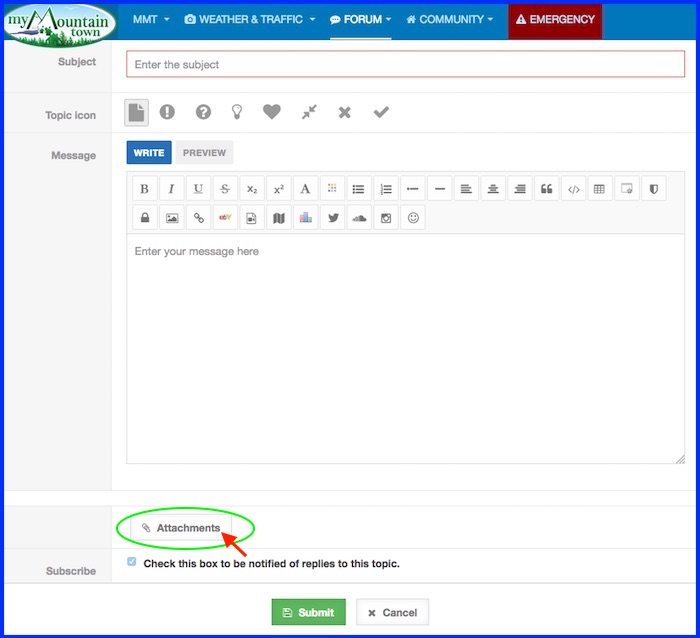
1. Start a New Topic or Reply to an existing Topic to open a dialog box. Click on Attachments at the bottom:
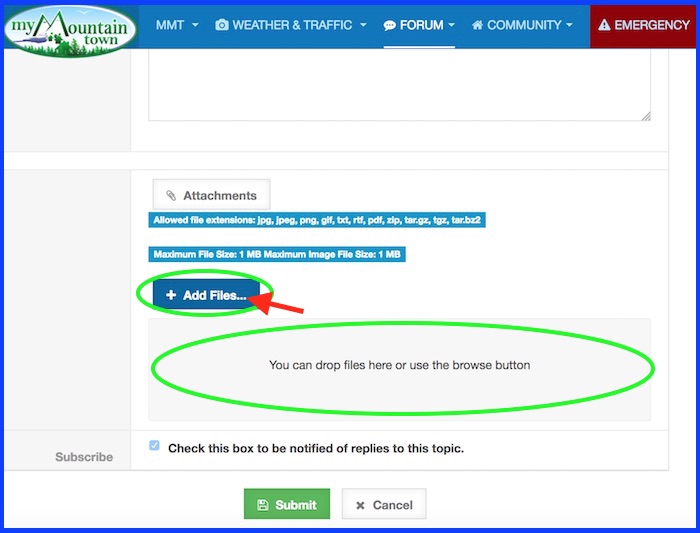
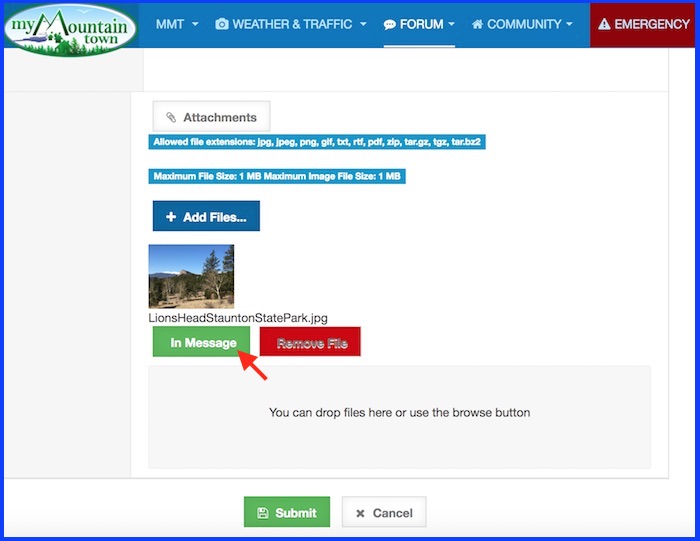
2. Choose an image from your computer files by clicking + Add Files... blue button, search your photos folder, then drag and drop the image into the box below the + Add Files button where it says "You can drop files here or use the browse button." You can also double-click the image you want to add it if it's not as easy to drag and drop from your folder:
An important note: only the file types listed below the Attachments button can be uploaded. This includes the most frequently used image types, but if you have any trouble uploading, please email This email address is being protected from spambots. You need JavaScript enabled to view it. and we'll be happy to assist. If an image is not uploading, it's either the image file type, or the file size is too large (over 1 MB). Dimensions of the images are not important, as the system will automatically shrink anything larger than 800 pixels wide down to fit inside the forum box (and further still to fit mobile device screens).
If you need help re-sizing a photo to shrink the file size, email it to us! A good rule of thumb to shoot for on file size is around 100-150 KB. Even though we can accept up to 1 MB (aka 1000 KB) in size, the smaller it is, the faster it loads on the screen when someone opens your topic, and with the internet issues many face in the mountains, this can be critically important. Changing the dimensions (from 2500 pixels wide to 640 pixels wide for example) or changing the resolution on the photo (from 300 dots per inch [dpi] to 150 dpi or even 72 dpi) can help a ton.
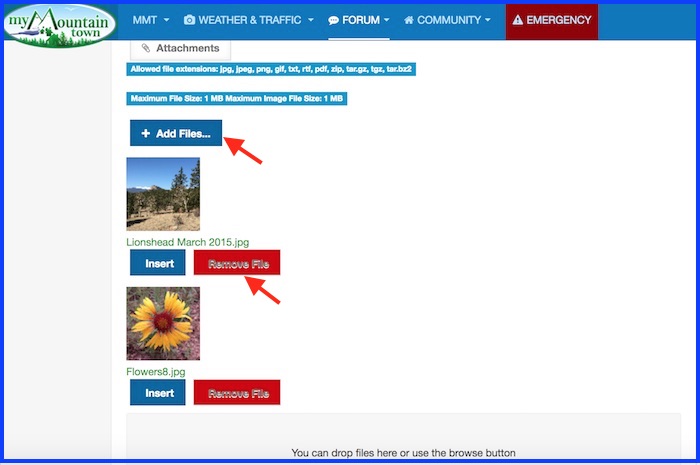
Once you've added your photo, you'll see a thumbnail displayed below + Add Files and two new buttons below the image that say Insert (blue) and Remove File (red). If you do not click the Insert button, the image will display in the final submitted post as a thumbnail attachment at the bottom that post that users can click to expand. This saves space if you have multiple images to upload. You can add up to 8 total images per post by continuing to click the + Add Files button. You can remove any image you wish by clicking the Remove File button below that image.
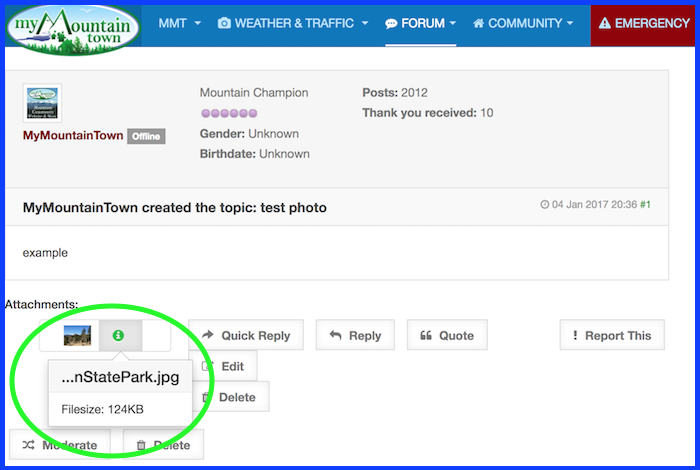
3. If you are done writing your post and click Submit at the bottom, and you have not Inserted your image, your final post will look like this:
Members and guests can click on that attachment circled at the bottom to open it up into a pop-up window.
4. Now, backing up a step. Should you wish to have your image displayed full size within your post (not attached as a thumbnail at the bottom), then before you submit your post for publication, click the Insert button below the image. That button will then turn green and say In Message (caution, if you click that In Message button again, it will add a duplicate image to your post):
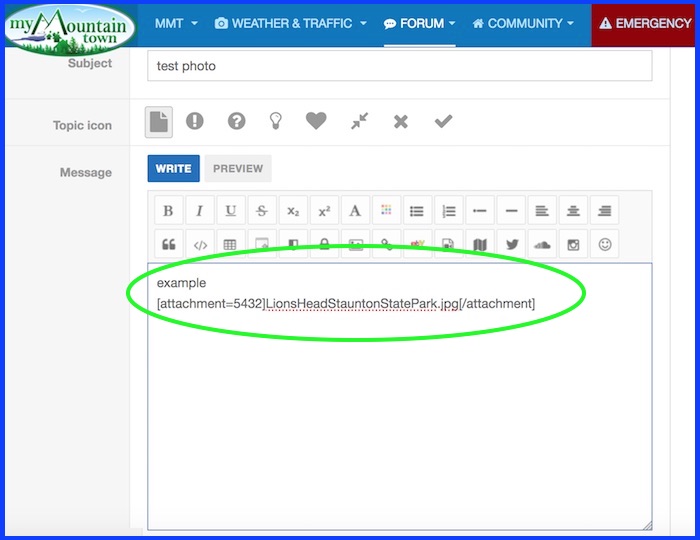
5. After you click the Insert button and it changes to In Message, if you look at your post, you should see text that starts with [attachment=xxxx]name of your photo[/attachment] like this:
Two points to mention here:
1. You cannot upload different files/photos with the same exact name or it will display the first image twice because it cannot differentiate between the two separate images; to the system, they are identical.
2. Though not necessary, naming your files to something that indicates location, subject matter, or tags a business or nonprofit where it was taken helps Google index those photos so they can be found in an image search by anyone using those specific keywords you choose. Often images taken on phones are labeled IMG_1234 or something along those lines, go ahead and rename them before you upload them!
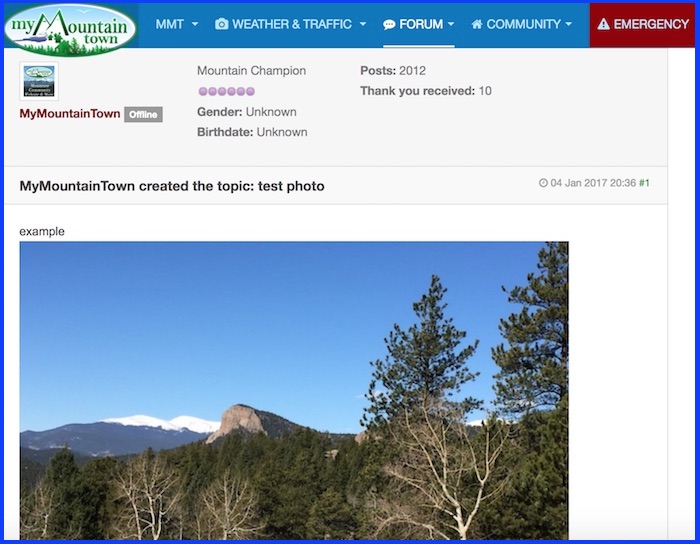
6. Viola! Once you finish typing the message you wish to post with your photo(s), and click Submit, this is what it will look like:
Last edit: 06 Jan 2017 11:46 by MyMountainTown. Reason: update for newly upgraded features
Please Log in or Create an account to join the conversation.
- MyMountainTown
-
 Topic Author
- Mountain Champion
-

11 Jan 2015 19:43 #2
by MyMountainTown
Replied by MyMountainTown on topic How to Upload and Post a Picture
Did you know that you can upload photos to a topic/thread straight from your mobile phone or tablet?! Below is a tutorial from an iPhone and it applies similarly to an iPad. We'll post a tutorial for an Android device after this.
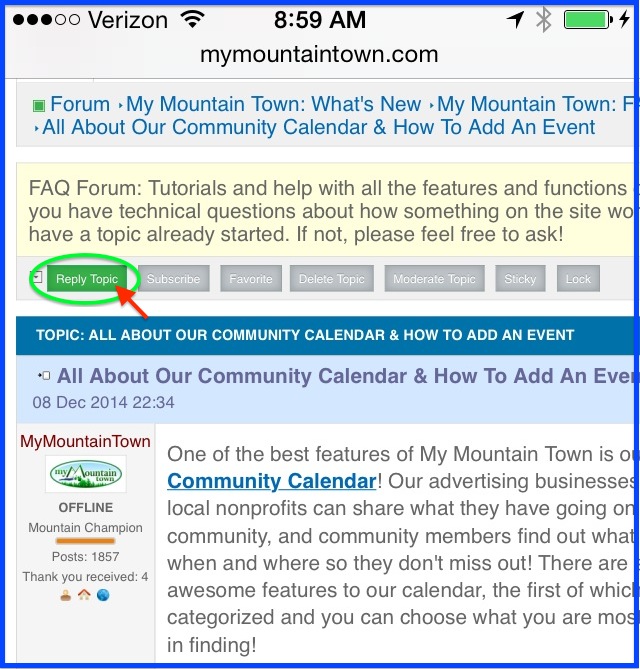
First log in and either start a New Topic or Reply to a Topic.
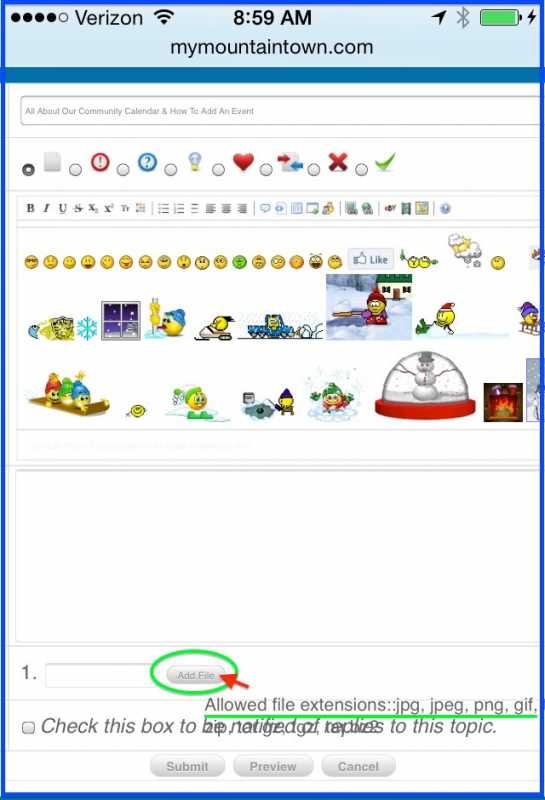
This will open up the dialog box screen. Feel free to post a message before or after uploading your photo. If you'd like to receive email alerts if anyone replies to this topic after your post, check the circled box before hitting Submit.
Next, click on Add File. The image types that are allowed are shown below, it's all of the usual ones.
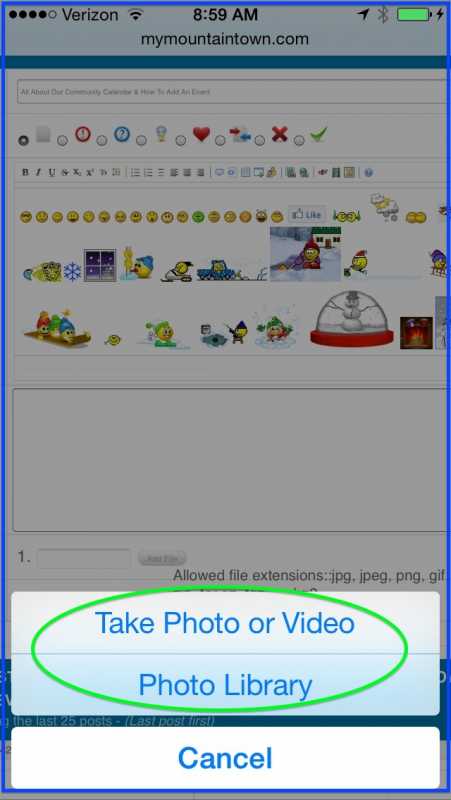
Clicking Add File will open up a new screen that gives you 3 options: Take Photo or Video, Photo Library, or Cancel. If you have one already taken, choose Photo Library. If you are about to take a photo or video, choose the first option. You'll have to allow Safari to access your photos to do so if you go this route. If you change your mind, select Cancel.
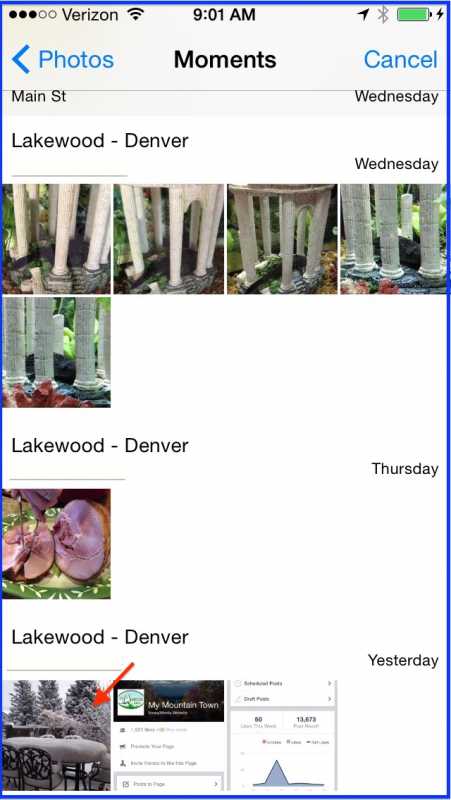
Choose which photo in your camera roll you would like to upload.
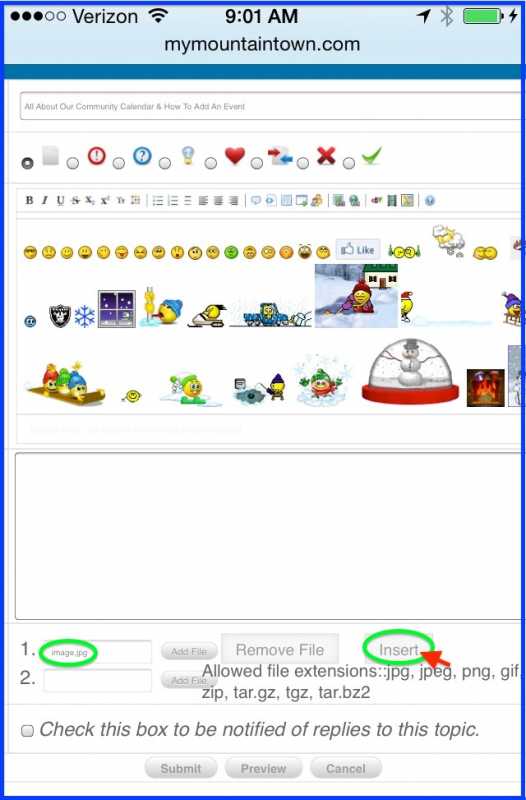
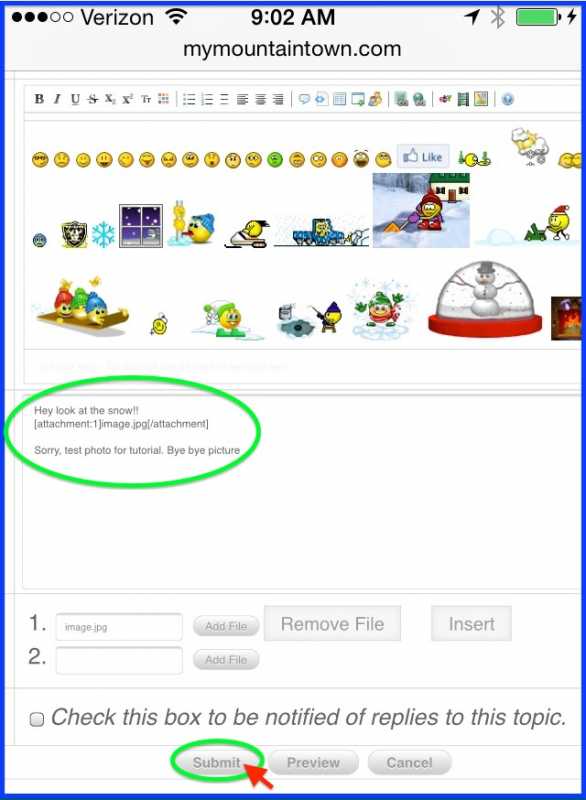
Once you select a photo, it will show in the once-blank box to the left of the Add File button. Click Insert to add it to the post you are making.
Once you click Insert, you'll see the image link in the Dialog Box, along with any message you typed previously. You can add more text at this point if you wish, or add additional photos. You can have up to 8 photos per post. When you are finished with your post, click Submit!
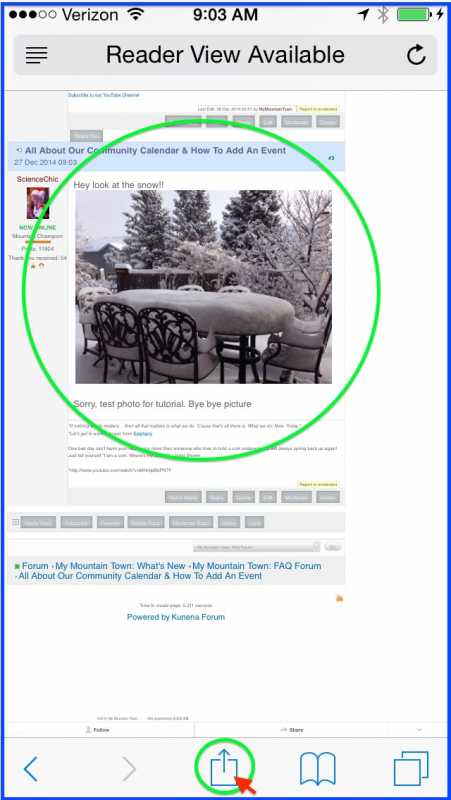
After you click Submit, you'll see your photo and message added to the thread!
Now, if you'd like to share this further, click the document with the up arrow at the bottom (circled in green). That should give you options to text message, email, share to Twitter, share to Facebook, add a Bookmark of that thread, add to Reading List, Add to Home Screen, or Add to Shared Links. Feel free to share!
Please Log in or Create an account to join the conversation.
- ramage
-

- Mountain Legend
-

Less
More
- Posts: 4388
- Thank you received: 94
13 Dec 2019 09:41 #3
by ramage
Replied by ramage on topic How to Upload and Post a Picture
Can one upload video files to MMT? I have red through the Tutorial of Uploading Pictures but it does not address videos.
thanks
thanks
Please Log in or Create an account to join the conversation.
- MountainTownTechCrew
-

- Mountain Folk
-

Less
More
- Posts: 99
- Thank you received: 0
13 Dec 2019 11:13 #4
by MountainTownTechCrew
Replied by MountainTownTechCrew on topic How to Upload and Post a Picture
Hello ramage!
We have a separate topic for How To Upload Videos here (which we need to update since the editor bar now looks a little different) and to answer your question, yes, you can upload both YouTube and Vimeo videos in posts here.
YouTube is the easiest, you simply have to copy the url in the browser and paste it into the post - it will automatically create a thumbnail of the video that can play within the post. Vimeo videos are a little more complicated in that you have to copy the ID for the video and follow the instructions in that tutorial above to have it display within the post as a thumbnail.
You can always copy and paste any url to any webpage that has a video embedded in it and simply let readers know that there is a video at the link you are sharing and they can click to go to that page and play it for themselves.
We do not have the ability to upload and store raw video here like one can to Facebook, Twitter, or other social media platforms. It's simply too much for the amount of server storage space that we have.
If you need any help posting a video, or would like us to walk you through getting one posted, please give us a call - 720-608-0285.
Thank you!
Please Log in or Create an account to join the conversation.
Time to create page: 0.585 seconds

